Showing posts with label Tutorials. Show all posts

Recycling Chocolate Foil Wrappers & a Tutorial

I have love recycling things for crafts and one of my favourites is reusing chocolate foil wrappers. So what a wonderful way to start the New Year with a crafty tutorial that also recycles something that is commonly thrown out!

Chocolate Foil Wrappers are so bright and come in such pretty colours I just had to make them into something! I just love the festival they add to a project.

 At the end of this post I will show you how to make this beautiful butterfly card


Below are some more things I have made or decorated with chocolate foil wrappers.

A cigar box decorated in scraps of foils topped with a foiled handmade butterfly

Another cigar box decorated with a mosaic scene and a foiled handmade butterfly

A beautiful beaded & foiled handmade butterfly fridge magnet

3 small foiled handmade butterflies decorate this trio of squares on a card.

As you can see the handmade butterflies are a common denominator to these crafts. Read below to learn how to make your own foiled butterfly

Butterfly Foil Card Tutorial


Supplies

Butterfly stamp
Jet Black Staz On Permanent Ink pad
Cold Laminate
Tweezers
Chocolate foils in various colours (enjoy eating the choccies)
Card stock
Coluzzle Oval nested shapes &
cutting knife & mat
Craft glue
Kindy Glitter Glue

Method

  • Stamp butterfly on the front of a cold laminate scrap with Jet Black Staz On
  • Peel off backing off the cold laminate.
  • Apply small pieces of foils coloured side against tacky surface, in areas as desired or follow photo for placement suggestion. Working with small pieces is easier to ensure minimal colour outside chosen areas. A pair of tweezers is handy here!
  • Continue adhering the foils until whole butterfly is covered.
  • Cut around stamped and foiled image.
  • Bend  laminate to lift wings.
  • Using the Coluzzle Cutting System or other cutting system, cut 2 ovals for card front as per photo.
  • Glue ovals onto card front. 
  • Decorate card base as desired 
  • Glue butterfly's body only to the top of card as per photo, lifting wings slightly to give definition..
You can also make a lovely garland using the chocolate wrappers.  

  I have shared this tutorial on Savvy Southern Style 
There are a lot of other entries to entice you there.

I swear you wont be able to look at a foil covered chocolate in the same way ever again. The fastest way to gather a wide selection of these foil wrappers is at Easter. They abound on so many Easter eggs, bunnies etc

Ruffled Christmas Tree Skirt Tutorial

I have started on my Christmas planning for this year. That's how I found this that I hadn't posted this Ruffled Christmas Tree Skirt, which I made last year!

I know I first saw it on Pinterest, maybe in the early days. Don't you just Pinterest? I collect ideas faster than I can make them up! Anyway though I couldn't find the one that inspired this skirt, it is just of those ideas which stayed in my mind. What I ended up doing is working it out from making a twirly skirt for myself for a fancy dress up one year in ages past, similar to the twirly gathered skirt I made for one of my grand daughters. The tree skirt is something I had wanted to do for a long time and finally last year, I bit the bullet and just got in a did it.


Ruffled Tree Skirt Tutorial

Step 1: Cutting


Cut the largest circle from a large piece of scrappy material that I was never going to use for anything really – it was from a practice piece of fabric printing done some 10 years ago (Yeah, yeah, I know, I keep stuff for far too long!) If you are starting out with a new piece of fabric or just want a ball park figure to start you off with then may I suggest you buy or cut a piece to 115cm (44 inches) thus utilizing the whole width of a 115cm piece of cheap cotton. Feel free to use whatever material you have on hand, even an old bed sheet or a valance that is no longer being used. I remember when we all had valances on our beds. Now they just look so fussy. You could use some fleecy, or an old blanket would work too. If your material is only 1 metre wide then use that. You’ll just have a slightly smaller tree skirt or you could sew on a deeper strip on the end. It is all up to you and the resources you have on hand or what you choose to buy. Now where was I? You’ll just have to bear with me when I run on and on. My family often tell me to ‘get to the point’. I try... but it is so jolly hard for me!

Diagram1

Step 2: Marking

To draw a circle, I first fold the material in half and then half again from mid point on the fold line. This is just quartered, but I like to fold it just one more time keeping that same mid point as the pivoting point See Diagram 1
Pin one end of a string or tape measure to this mid point and measure to the other end 56cm (22″) if you have managed to have a 115cm material to start out with. Otherwise just mark your circle to the longest length you can. Us the string or tape measure and draw your circle.
While I have got the material all folded and neat I also mark out circle at 10 cm intervals up to the inner circle. You can get a better idea from Diagram 4 even though this is jumping ahead a little. I also like to mark each circle into half, quarters and eighths now (like a giant pizza) – the purpose will become clearer in Step 6.

Diagram 2

Step 3: Cutting the base skirt

Cut on the largest line. Don’t open it up just yet, however if you did you would see that you have a nice circle.
Now I want you to cut out the inner circle. An alternative is to use a small cake plate and mark out the inner circle for cutting as per diagram 2.


Open up the fabric and you will have a circle with a hole in the middle as per diagram 3. Diagram 4 is a closeup for you to see the lines better.

Diagram 3
Diagram 4 -  a close up
One more thing to consider at this stage is that if you are unable to place the tree inside the hole for example you use a fresh tree each year, then you might want to consider cutting up one of the fold lines from the rim to the centre hole as per diagram 4c

Diagram 4c

Step 4: The ruffles

Consider any material you have on hand that might fit the job then go out and buy whatever you need to make the ruffles for your Christmas Tree Skirt. I like to play with the way different fabrics look in the rows. This would look lovely done in an ombre colour themes to suit your colour palette. You may even decide to go with a single colour such as bright white to emulate snow. It would also look lovely in rustic homespun or unbleached calico too.

Diagram 5

As a guide you will need something like the following fabric lengths. I calculated using the maximum widths of the material (minus the edges) in multiples of 15cm (6 inches).
  • Two – 15cm x 112cm (6” x 44″) strips for the first centre ruffle
  • Four – 6″x42″ strips for row 2
  • Six – 6″x42″ strips for row 3
  • Seven – 6″x42″ strips for row 4
  • Eight – 6″x42″ strips for row 5 

If you look at my finished skirt, you will notice that both my greens were a bit narrower as I used fabrics that were on hand from my stash I just purchased the two larger reds, even the smallest red was from my stash. I had to use the red as my centre as it was the smallest fabric I had on hand. I played around and nearly went all various shades of red as per diagram 5 but in the end I decided to use some greens I had in my stash to break up the reds.

Step 5: Finishing the edges

You can leave the edges raw, (pinked would reduce any fraying), finish one edge with a rolled hem or you could overlock (serge) it like I did. See Diagram 6. Never use pins when overlocking! It will break your cutting blade!!!

Diagram 6

Don’t forget to calculate the hem allowance if you are going with a rolled hem. You don’t want the underskirt peeking out, esp if it is ugly like mine!

Step 6: Gathering

Most people would tell you to gather it by sewing a long straight stitch on one edge and the pull either the top thread (or the bottom) until it gathers to fit in the smaller area you require. I might do this if it were a skirt to be worn, but I like to cheat and skip a few steps if I can to speed things up. What I do is pin every inch or so and fit it as I go. I do mark the strip into quarters and eighths and pin it to the corresponding spot on the skirt base. See Diagram 7.

Diagram 7

Step 7: Sewing

I start with the outer ruffle and work inwards insuring that the skirt base is complete covered even if I have to move my circle marking to accommodate my narrower green strips as was the case. See Diagram 8. I sew right over the pins removing them as I go over them.

Diagram 8

Step 7: Bias tape 


I apologise that I do not have any diagrams for this last step. However I finished off the raw edge of the centre circle with some self made bias tape. The easiest way would be to buy a co-ordinating or contrasting cotton bias and sew it on. Calli has an excellent step by step tutorial on how to encase a raw edge with bias binding.

Looking back, I think my darker green strip was a bit too stingy with the gathering of the fabric. I might be inclined to replace it one day. But for now it stays. You hardly notice it when it is full of pressies anyway.


The finished Ruffled Christmas Tree Skirt

The Christmas Skirt adorning the base of the Christmas Tree.
What Christmas decorations have you made?

Zebra heat pack

Well this week has been rather hectic but still I managed to get another heat pack made. This time it is my zany  Zara Zebra.


Things don't always go according to plan. This cute zebra wasn't meant to be a heat pack. I was aiming at making a hobby horse type zebra with this printed flannelette material I had pick up in the remnant pile from my local Spotlight store.

I designed it, cut it out and sewed it up. But when I went to stuff it, it just didn't look big enough. By the time I had rounded it out the head appeared too small for the broom stick. Bummer!

But I can't waste it completely, so I thought I'd fill it with 2 cups of rice and turn it into a heat pack! So now it can join the other heat pack owls I made here.

Instructions or rather how I did it:


  1. I cut the material to my own pattern.
  2. Out of some felt, I cut a strip of black approx 10cm (4 inches) wide and 22cm (8.5inches) long and cut a fringe along one edge. I cut two black circles and 2 white circles for the  eyes. I also cut 2 sort of triangles in black  for the ears and 2 smaller white triangles for the inner ears.
  3. The ears and mane were placed along the seam line between the main fabric and sewn into place at the same time as doing the main seam, leaving about a 3cm (1 inch) gap at the bottom.
  4. I used a funnel to direct 2 cups of rice inside the zebra.
  5. The sewing the opening closed with a whip stitch.
Ta da! It is finished.

Do you prefer the owls or the zebra?

I rather like making these. I might try some other animals...
but first I really want to conquer the hobby horse for my granddaughters!!!

DIY cute and easy owl heat pack

We have the gorgeous Tawny Frogmouth Owl on our property. He is so well disguised you are hard pressed to find him unless he moves. Now in the fabric & craft world one can see owls everywhere. So I decided that I wanted to make a cute owl heat pack for my grand daughters.


It is a hoot to sew this simple and absolutely adorable, microwavable owl heat pack.  I played with various design concepts and each one was different from the preceding one. This owl has been strongly influences by Dustin Pike's cute digital clip art owls. To keep things nice and simple, this tutorial is the easiest version.

Owl heat pack tutorial


Materials I used:

  • 2 larger scraps of material approx 20 x 20cm each (8 x 8 inch). I used a minky type fabric for this tutorial, though my other ones have been made from fine pin-whale corduroy. Duck, ticking and most tightly woven cotton materials would be best. Fleecy works well too.
  • Felt scraps for the eyes and beak. A few of my owls had the eyes made from scrap materials too!
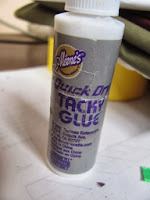
  • Aleene's Tacky Glue
  • 1 1/2 cup rice 
  • 1 sprig of lavender (optional and interchangeable with other scents though not many flowers work well unless pre-dried.
  • A funnel was handy. 
  • Pattern: See the end of the post for the free pattern. 

I mostly used my machine for all stitching though I would hand sew the lot if I were traveling on the road, since it is a small project and I like hand sewing too - though my blanket stitch leaves a lot to be desired! LOL

Instructions:

CUTTING
Cut a basic outline of the owl body shape with a 5mm (1/4 inch) seam allowance.*and then from a contrasting or coordinating fabric, cut 2 wing shapes.

Then from some felt remnants, draw a triangle for the nose and some circles for the eyes. *

Then the larger 'double circle' shape for the joined eye patch
Right so that is all the material cut and ready for sewing now. Play around with placement and pin if desired.
I need to go and wet and iron my pink eye patch - it just wont lay flat!

SEWING

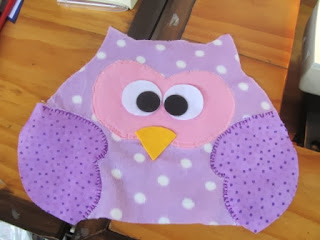
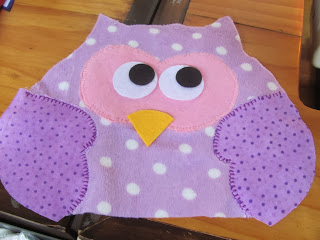
    Sew the wing shapes  onto the body front using a zigzag or blind hemming stitch.**.

    Sew the larger 'double' eye in the same manner as the wings


    Since I have used felt I decided to glue the beak and the rest of the eyes. First I glued the beak and then the black pupil to the white of the eye. Before the final attachment of the eyes, I played around with a couple of different eye positions just for the fun of it. Which look do you like best. I think each changes the owl's expression!


    He is getting dizzy with all the changes  - LOL
    OK I decided he is going to be looking up! So I glue it on.


    Now to the actual bag/body part First pin it right sides together. Don't worry about the wings hanging out as they do on mine.

    Place right sides of the body together and stitch small straight stitches leaving a 5cm (2 inch) gap at the base. My machine is playing up and skipped a few stitches every now and then so I decided to sew around a second time as I certainly don't want any rice leaking out!!!


    Now I like to clip the pointy ears to remove some of the bulk.


    I also like to clip around the curves, even to removing little triangles in the seam to reduce the bulk. It is not strictly necessary, but it is what I like to do.


    That's the machine sewing done. Now turn the bag right side out. I like to use a fat pen with the pen part wither retracted or removed to poke the ears out. I found a knitting needle more often poked a hole through the fabric for me.


    Using a funnel for ease, add  about 1 and a half cups of rice, or wheat and a tiny little of whichever flowers or herbs you would like to use.


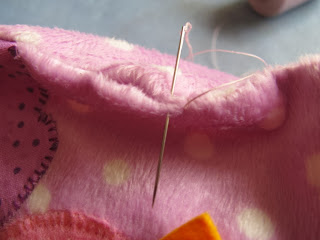
    Hand sew shut the gap. And you are done.
     
    It actually is slower taking all the photos and writing up the steps than it is to just get stuck into the job. It really is so simple and doesn't take much time at all.
    Tada!

    To use: 

    Microwave for 1 minute and then in 10 second increments until your owl is nice and warm. Be careful not to microwave for any longer than 3 minutes as it will overheat.


    Hints: 

     *     I have a PDF pattern you are free to use to your hearts content with no restrictions other than no direct use of pattern on your blog or other media but feel free to link back or sew and sell finished owls anywhere.
    **   A Blind hemming stitch can resemble a hand sewn blanket stitch by altering the settings.
    *** With felt and fleecy, you can avoid sewing by using a soft tacky glue such as Aleene's
    Machine sewing the eyes - just take it slow and turn constantly

    Variations:

    You could stitch the body around the edges on the outside instead (and avoid the turning bit) for a more rustic look. You will still need to leave a gap at the bottom for the filling before continuing with the sewing. Be aware some fabrics will fray more than others, for some that is part of the charm. You could also cut the shapes with a pinking shears which will reduce a lot of the fraying.

    Button Eyes?
    I choose not to use buttons, firstly because my original owls went to very young children and I didn't want the risk of them choking on a button if it came off. Secondly, buttons are hard and uncomfortable in some positions when using a heat pack. Be especially aware of the googly eye type buttons as many of them are made from a soft plastic which could melt or worst in a microwave oven.

    Stuffing:
    I prefer rice to wheat as the heat material for the much lower allergen problems. Both are prone to absorbing moisture if in a high humidity environment. If this this the case then I suggest you make a cotton calico inner bag and then the outer owl. This way you can replace the inner bag and keep the decorative outer bag. I also like to add a sprig of lavender. You could add a variety of scents. Try a cinnamon stick for a spicy scent especially for a male recipient.
    Of course you can turn this into a softie just by changing the filling from rice to fibrefill.

    Feet?
    On one owl, I added little ribbon feet before sewing the front and back together
     

    See his little feet poking out?
    This next one was my very first owl. Sewing the wings on like this was much more fiddly, but I really wanted to incorporate the hearts which were left overs from a skirt I had made recently for one of my grand daughters. The feet was pretty simple.

    I hope you can just click on the picture above and save it to your computer. Enlarge it to fit on your page when printing. I had a go at embedding a PDF file, but I didn't like the look on my blog post. Since it was my first attempt, maybe I did something wrong. If this doesn't work for you then just send me a message via email, Google+ or Facebook and I will send it to you by return email.)


    I have entered this in my first craft linky party. When you click on that button it takes to the 'party' where lots of people are posting their crafty posts (and some yummy recipes) for the party.

    I actually found another linky party, so here are the two parties. Please come and join me on the new adventure!

    All Things with Purpose