This where I share my crafts, favourite recipes & anything else life has to give us. Michelle
Showing posts with label stamping. Show all posts
Australian Grass Tree Explosion Box
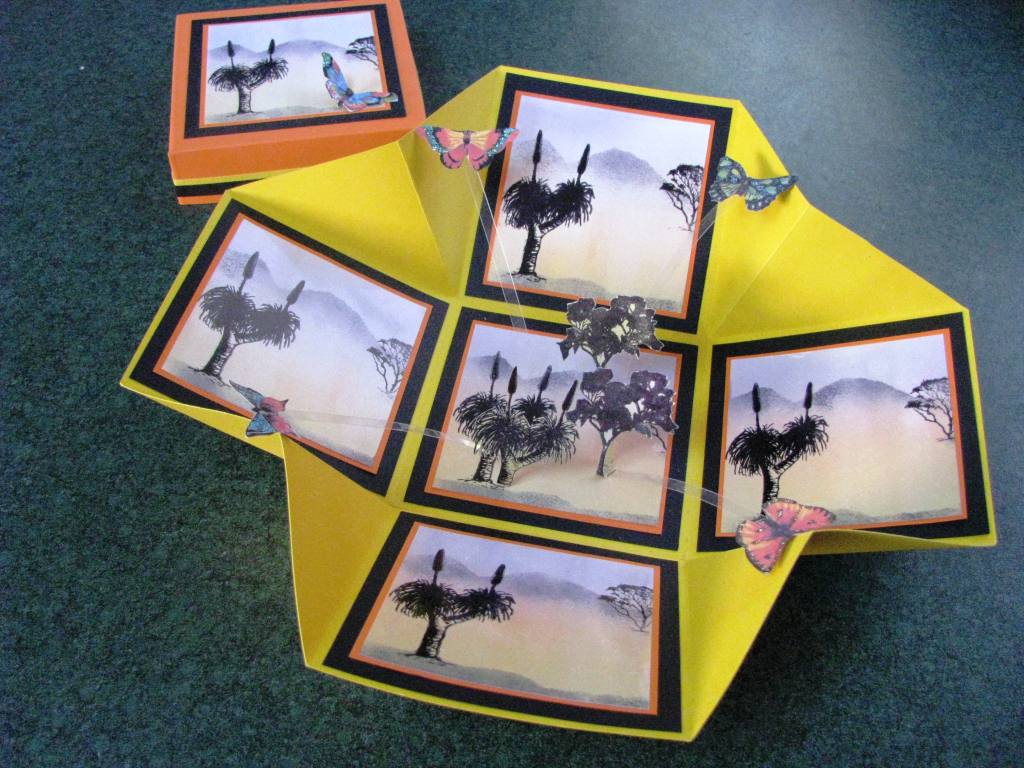
I designed this Australian Grass Tree Explosion box in honour of the beautiful grass trees that we have seen around the north west of Australia in particular and the need to make some boxes that might appeal to a male recipient. In the middle I have added a gum tree and 2 stamped gum trees cut and erected as a free standing pop up. The background mountains, sky and ground has been sponged.
I used Archival Jet Black ink to stamp the trees and sponge the mountains and ground with a hint of brown and yellow inks for the middle ground and blue for the sky. The masks for stamping were free torn post it notes with 'peaks & valleys' torn as I went.
All these were done on glossy white photo paper which were then matted on orange card stock then black before laying the whole onto bright yellow card stock. I cut the corners into a diagonal cut for a change to make it quite bright. For contrast I made the lid from the same orange card as the layer. I just couldn’t help myself, I just had to add a few dancing butterflies.
The trees are all Print Block stamps from eons ago. The cards are from my stash which could be from anywhere. Sorry most of my papers & cardstock were just bought and kept with out any reference to who & where they came from.
Do you think this is more suitable for a male? Or is it too bright?
Christmas Card and Crafts
I am back at last. My husband and I are back on the road. We flew 4,000km back to the other side of the country to continue our trip around Australia in our caravan. We stayed in Perth for 4 days, settling in efore heading south. You can follow our trip if you are interested on our Robbiebago blog. I have been busy cutting out flowers and other images, In the meantime I let me show you some of the craft items I made this past Christmas. First the first time ever I made 50 of the same card design for Christmas. I really wanted to use my lovely poinsettia Spellbinders die and I fell in love with a pleated sort of card design and ends up being an almost exact copy of a card designed by Valita. Click here to see Valita's blog. The leaves were cut on a silver metallic paper with a brand new hole punch which sadly didn’t last the distance, doing less than 5 punches before breaking and punching paper only too! I took it back and replaced it with a L-Em punch that is similar in design. The swirly stamp is embossed with Gold embossing powder. It is about time too as I don't think I have done heat embossing for a long long time. The triangular pleated feature is very simple and looks great. It is explained in great detail and on Valita's video tutorial for those who like to see it being made.
The note books were commercial notebooks I picked up at Officeworks and I covered them with lovely decorative papers and ribbons. The flowers were hand made by me and are very dimensional and glazed with UTEE. The skeleton leaf is one I bought from Print Blocks eons ago and the green leaf is hand cut and distressed. The letters hearts are chip board from my collection which I painted and/or glittered accordingly.
Hand cutting and shaping the flowers
I quickly discover that to get the size flowers that I want for my explosion boxes, I will have to hand cut the larger blooms. Thankfully I am still a child at heart as I absolutely love cutting (and colouring) and so this does not present a hassle to me.
I am so lucky in that I am able to cut, colour, shape and glue the flowers whilst on the long drives between places as I do not get car sick at all. So while I chat and listen to my hubby and watch the scenery past, my fingers are busy if I want to craft.
![]() |
White open roses tinted with a touch of purple. Mini Photo display style. |
![]() |
Pink roses on a stamped swirl background that has been glittered |
![]() |
Yellow tinted open roses with hand cut leaves. Swirl is a punch |
Early efforts at Explosions Boxes
Here are a few of my earliest efforts at making Explosion Boxes.
![]() |
My very first one - made for my best friend. Made with commercial silk flowers & rub ons |
![]() |
My first attempt at making my own flowers (from Fred she said blog). |
![]() |
A photo box made with silk flowers |
![]() |
My first stamped box together with my first 3D paper flowers |
I think the silk flowers are nice but I wanted to have a go at making my own flowers.
I wanted a more creative input. It quickly became obvious that butterflies were going to be part of my 'signature' on most of my boxes. I love butterflies. One day I might even try making some.
These butterflies are printed from the internet already coloured. I cut 2 and glue them back to back.
Subscribe to:
Posts (Atom)