Showing posts with label Explosion box. Show all posts

The most amazing Christmas Explosion Box


Every once in a while, I surprise myself. This Christmas Box is one of those times. I just think this is one of my absolute favourite items. I know I shouldn't blow my own trumpet, but I am so happy with how it turned out, especially after a few hold ups along the way.


I started the box about 2 months ago. I made the box base and stamped & glittered the inside pages. It looked terrific. I loved this. I made some of the trims, such as the red contrast punched strips which I made into 'pockets' into which the photo or journaling could be  partially inserted on 4 of the pages. Another set of pages had red ribbons as anchors and corners. Then that was that! It just wouldn't come together any further for me. I guess most of us have this happen now and then.


None of my stamped images 'fitted' in cohesively. It just wouldn't gel. I left it for a bit. I went down to a scrapbooking store and finally found some card candy that I thought would suit. So I bought my first ever card candy! 


Great, I am off and running again! I made a tag & stuck the various candies over the pages. I stalled at trying to come up with the centre feature. I still couldn't finish the box...


I just didn't have a clue what I was going to do this time. So I left it again, this time for something like about 6 weeks as so much as happened in the meantime, such as a 3 week visit to the other side of the country to meet my new darling granddaughter & be reaquainted with her sister & parents.


Then home again to all sort of bits & pieces such as a mammogram and associated testings which was iffy for a bit. Then two funerals in one week. Now my MIL is in hospital and not expected to come home and my hubby has done his back in and can hardly walk but obviously wants to make an effort to see his mother as much as possible! So all in all it has been rather sad and hectic.

I was dying to get in and save my sanity with some crafting and just the other day the penny dropped on what  I could make for the centre. I thought of doing a 3D  Christmas tree! Yay! I can finish off the box. I hand drew and cut 3 Christmas trees out of Bazzil card. I folded them down the centre and glued just the centres to each other but ensuring that the halves were not glued closed giving the appearance of 6 'pages' of the tree making it very 3 dimensional. When it was dry, I added glue along the cut edges and applied white Flower Soft and sprinkled ultra fine Crystal glitter over the wet glue. I then cut off & glued mini baubles off a tinsel room decoration and re-purposed them for my tree. I even got to use my brand new Sizzix Star Burst Die which had only arrived yesterday! I had 5 acetate strips for the bouncy fluttering things that help make it 'explode' when it is opened. The tips of the strips had a wooden angel, a couple of 'spare' stars and some holly leaves attached to them.


 I didn't start on the lid until I had the rest of the box done so I could tie it all together. I stamped and embossed a greeting onto a white square card which I layered with a scalloped green card and added a gold a copper star burst die cut. more red border punched trim and a white bow ties off the lid beautifully. One more Christmas tree adorns one side of the box with it Flower Soft and glitter touches.


It is done at long, long last. I love it. I am sure you will too. I have had enough for today even though it is still only 8pm. I will list it in my shop first thing tomorrow. I am sure it will be snapped up soon. So if you like it, you had better be quick about it. I am off to vege in front of the tele.
Good night to all.
Michelle


Asiatic lilies birthday Explosion Box


I just love making & giving explosion boxes. The surprise people get when they open their seemingly innocent box and the walls fall down seemingly as though it is exploding, is just precious. 

The flowers in this box are similar to one that I made for my second daughter's 21st some 2 years back. Asiatic Lilium are her favourtie flowers and so I took it upon my self to figure out how to make these wonderful flowers. I used Joanne's Mainly Flowers blog entry as a starting point and modified it from there.
The petals were hand cut card which I coloured using sponges & pink ink and a pink art pen to draw on the spots. 


I then proceeded to roll the petals into shape and glue around the card stamens that I had cut in a quilled style, flaring out the tips and adding a touch of glue & glitter to them. 


 I stamped, coloured and border trimmed white panels before adding a touch of glitter to the words & the swirly designs.


As usual there are my 'trademark' butterflies fluttering around.If you are interested in this or one of my other explosion boxes then visit my Zibbet shop.
So thank you to Joanne for your inspiration

Do drop a line. I would love to hear your comments.
Michelle

Cleanup: Getting there


I decided to knuckle in a make a supreme effort. I made some serious inroads in cleaning up my room.
The floor is tidy. YAY!

Well - my definition of tidy anyway LOL.
The 'small stuff' is sorted & into little drawers right on my desk. Handy!
The 3D flowers I have made are in take away containers on top.


My images including 'flat' flowers!
This is my Christmas stuff
Organized mostly 3D stuff - just some of my larger flowers on top
The same for the images and card fronts that are in various states of completion or rather incompletion (if there is such a word!) I have quite a few images that I have stamped ready for colouring, I think I am going to offer them as pack for adults and or kids some time in the near future.


I have finished an explosion box had been cut & scored and even the panels stamped and embossed. They just need adhering and some embellishments. So I found some flowers that were already stamped, cut and shaped ready to be used somewhere. The flowers are from a SU set...sorry I don't know the name of the set.


I have called this box the Veronica Flowers Explosion Box
Then I decided to take some of the card fronts and complete some cards. I completed quite a few cards this way. Mostly I took the easy way and just layered them using stuff that has already been some stage of partial completion. It might look like I have done lots, but really most of the work was already done, I have just stuck them together and finished them off basically! It is basically an eclectic mix.


These cards and the explosion box are available at my Zibbet Shop. See you soon as there's more to come.


Yoo Hoo I am back!

Not only did I have the 'flu for a whole month, our eldest daughter had to borrow our laptop, with a lot of my  photos on it, as JetStar were foolish enough to move her cabin luggage further back out of her sight and hence gave the opportunity for it to be stolen along with all her stuff and they wont pay more than $150 compensation. Grrr bad dog - JetStar. Enough of the whinge.

So along with everything including setting up my very own online craft shop, I have kept myself busy.

I made 2 beautiful glittery boxes especially with weddings in mind since I had sold the other wedding boxes I had at markets whilst travelling.


The first box it called Black Galaxy due to the marvelous black glittery card base the cox is made from. It has a gift card (or cash) holder and is adorned with delightful yellow handmade paper roses and my trademark butterflies fluttering around in the slightest breeze. A gift card holder is perfect for the couple who have already have a lot of items or the couple that you don't know well enough to know what their desires are.
There are words on each of the embossed and tinted interior panels. 'Congratulations'. 'Forever after', Just Married' and 'from this day forward'. This box is available for sale in my Zibbet Shop Inkspirational Designs. where you see more photos of this box along with other Explosion Boxes

My other Wedding Explosion box is a golden glittery box and has a selection of coloured roses.


In the photo above you can see the lovely detailed dry embossing, the slight touch of tinting of these panels and 3 of the roses on this side of the card holder. (PS it is a fake $50 note in the slot!)
Hoo Roo for now

Michelle

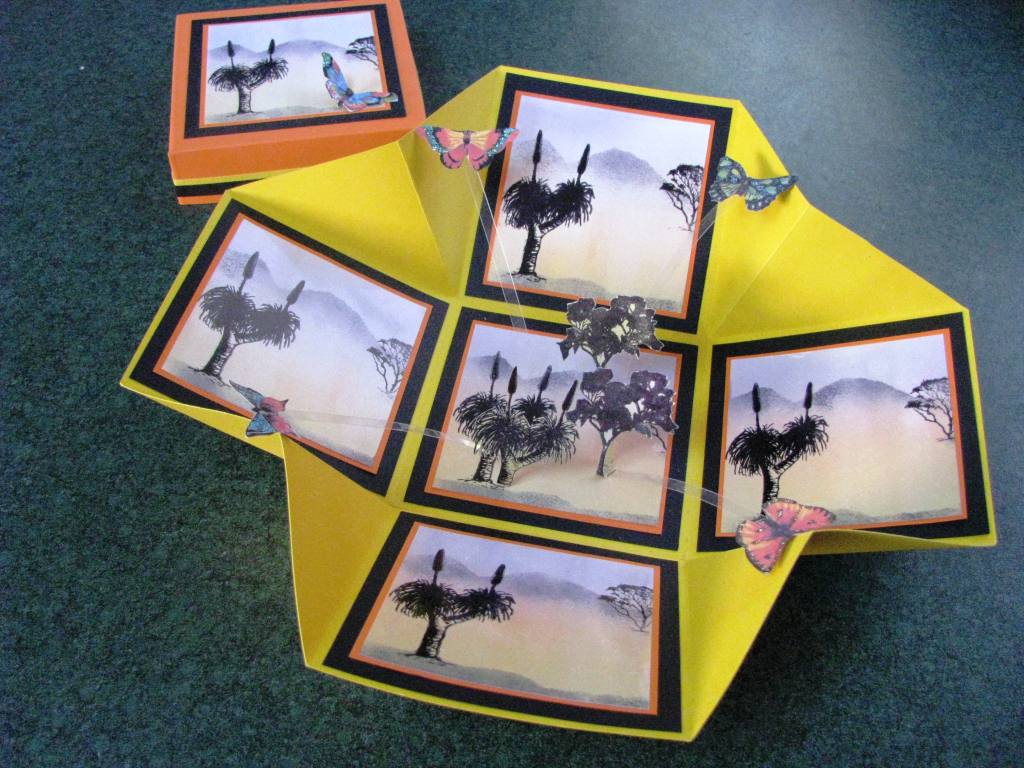
Australian Grass Tree Explosion Box


I designed this Australian Grass Tree Explosion box in honour of the beautiful grass trees that we have seen around the north west of Australia in particular and the need to make some boxes that might appeal to a male recipient. In the middle I have added a gum tree and 2 stamped gum trees cut and erected as a free standing pop up. The background mountains, sky and ground has been sponged.


I used Archival Jet Black ink to stamp the trees and sponge the mountains and ground with a hint of brown and yellow inks for the middle ground and blue for the sky. The masks for stamping were free torn post it notes with 'peaks & valleys' torn as I went.
All these were done on glossy white photo paper which were then matted on orange card stock then black before laying the whole onto bright yellow card stock. I cut the corners into a diagonal cut for a change to make it quite bright. For contrast I made the lid from the same orange card as the layer. I just couldn’t help myself, I just had to add a few dancing butterflies.

The trees are all Print Block stamps from eons ago. The cards are from my stash which could be from anywhere. Sorry most of my papers & cardstock were just bought and kept with out any reference to who & where they came from.
Do you think this is more suitable for a male? Or is it too bright?

Lilac Tissue Flower

Sorry it has been a while since I have blogged. I have been busy making all sorts of flowers, but I am running out of room for storing the explosion boxes in my caravan.

When out for dinner one night we were given this lovely purple serviette to cleanse our hands and face... instead I hoarded mine and went back to the van and made it into two 3d tissue flowers. I folded the serviette into 4 and then hand cut the wiggly circle shapes. I separated them into individual layers and then reattached them into two piles with a brad in the centre  of each flower through all layers. To make the flowers I then proceeded to scrunch all the layers separately and then partly open them to create the dimension and interesting petal shapes. I think it kind of looks like an old fashioned rose.

To make the box I used my cuttlebug to emboss 4 top card layers through the textile folder and then edged the card with a sponge and colour swiped off an inkpad.
The little flowers were made with a retro punch and a snowflake punch as stamens and touched in various colour inkpads.  For a change some of the flowers are also up on the acetate strips. I like this look. I may do more like this in future at times.

The small leaves are birch leaf punch from Carl and the swirl is a punch again from Carl. The larger leaves are hand cut following the basic shape of the birch leaf punch but using my deckle edged scissors. My butterflies are hand cut and glittered from a long forgotten museum website.


Here is a close up. Feel free to ask any questions.

Baby Animals Photo Explosion Box

My newest box has just been completed at the last camp which was at a Christian campsite near Perth.  (See Robbiebago if you want to know more about our trip around Western Australia). I had bought this cute wrapping paper at an el cheapo ($2) shop and thought it would make some cute images for a baby themed box. And then lo and behold I saw these foam shapes of animals too that I just had to buy as well. So here is the box I came up with. Click on any of the links to get a larger image up on your screen.


The flower is made of 'silk' frangipani flower petals that were given to me after being used as table decoartion at a party back in Geraldton. I altered them by tinting the white part of the petals with Denium Adirondack ink using a cut down sponge. Then I punched 3 flowers from my EK Success 5 petal flower punch and shaped the petals and punch a smaller Carl Sukura flower. The centre of each flower has a 'Designlines' spot of dimensional paint in metallic white. This is the same paint I used to create my own swirl of pearl embellishments that you can see. The animals are a combination of foam or paper cutouts. I made the paper ABC blocks, the foam lion and the foam zebra stand up using acetate strips behind them in much the same manner as I use the acteate strips to have the butterflies 'fly' above the images.

These top pages have tags that can be removed for either journalling or photos


These two images show the middle layers as having oval tags that slide into a pocket
 

The bottom layers have pretty tinted paper doileys with foam animals adorning them ready for photos.
The both sides of the layers can have photos or journalling so that all in all you could have upto 20 photos. What a beautiful & fun way to have your photo album on your coffee table ready for your guests to look at. it would also make a lovely gift. This box is for sale at time of printing. Custom orders are also welcome. Send me an email if you have any interest in purchaing one.

I thought my hobby was…

all sorts of card craft, especially making explosion boxes lately but I think it is really browsing the blog looking at everyone else’s fantastic crafts. I have been too tired after working in the heat the last couple of days to even make some flowers so instead I just decided to browse some of my fave blogs and even thought I would look up some of their fave blogs that I haven’t looked at yet! It is unbelievable the amount of talent there is out there and I just can’t seem to leave the computer. It is almost as though I might miss something if I go away and do something else. Consequently there are a few more links I recommend on my side bar. I just can't list them all. My interests and 'taste' changes and so might my links from time to time too.

But today, I am going to discipline myself and show you a couple more of my earlier boxes, since I am up nice and early and church is yet a few hours away before i need to get ready. Then I am going to be super good and finish my latest explosion box. I am getting quite excited by it. It is so different to my earlier work, but more on this in my next post!.


Last year I made two explosion boxes nearly the same. Oriental lilies are the favourite flower of one of my daughters and this inspired me to have a go at designing a flower and thus a box to house it. The flowers were hand cut card which I coloured using sponges & pink ink and a pink art pen to draw on the spots. I then proceeded to roll the petals into shape and glue around the card stamens that I had cut in a quilled style, flaring out the tips and adding a touch of glue & glitter to them. Both boxes had ovals cut using my Nestabilities dies. On Camille’s box I had modified a poem that I found on the net and typed up my version and printed it onto cardstock ensuring that it would fit within the oval before cutting. It wasted a bit more cardstock this way but ensured that it looked a lot neater than so much of my own hand writing would have done. As usual there are butterflies fluttering around. Camille loved her box and I hope you do to.


The second one is so close to being a carbon copy but it is generic and made for sale as a Happy Birthday box.

The boxes and flowers are time consuming. I really don't know how long it takes me to make one box as I rarely sit down and do anything in one go. Once in a while, I might have a couple of boxes on the go at once. It would save more time but I like making each one different and unique. As I have said previously, I make most of the flowers in the car whilst my husband is driving. As we are currently on a big trip around the centre and western part of Australia, there is a lot of driving involved. One day I will time it one time just for curiosity's sake.

Sorry I don't have a close up to show you. I never thought I would have a blog and I just took the photos for my own recollections.  I will endeavour to take a closer up view of some of the details in case anyone is interested with all future boxes.One day I might even make up tutorials if people are interested.

Thank you for looking. Do leave a comment as I would appreciate some feedback as to what you guys think of my blog and boxes. Suggestions are always welcome too.

Some paper flowers to show you

Beautiful Perth viewed from the even more marvellous Kings Park (which I was surprised to learn is larger than Central Park in NYC)
It is so stinking hot here in Perth these last few days. It is 39 degrees C in the shade (that's 102.2 Fahrenheit for you wonderful Americans). It is partly cloudy so I am grateful for that and an air conditioner in the Robbiebago (our caravan). Cooler weather is promised with a storm yet to come and that will bring it down to an expected 31 degrees C (88 in F). So that means it is too hot to work just now, so I am happily sitting down in front of the air con reading some craft mags, catching up on blogs and looking for some inspiration for the new yummy Chatterbox card stock I picked up early this morning when it was still cool enough to run around.


As my husband is committed to some volunteer work here in the outskirts of Perth until next Monday at least and there is no real work for me at present then I have some time to craft and what not.


Anyway as I was tidying up my photo album I rediscovered some photos of flowers that I made last year whilst on the road that I thought you might be interested in. Some have gone onto boxes already and so I will post some boxes too over the next few days. After drooling over some of the Prima flowers at the scrap booking shop I went to this morning I am most envious of their talent... but I will keep making them and hopefully improving as I really get quite a kick out of paper flower making. I am so inspired. I already of thinking of adding more glitter & bling and feathers etc to jazz them up a bit... we'll just have to wait and see how it all turns out.


First off though I am considering making another photo album type Explosion box since the last one was so popular. I might be able to sell one at the next markets I go to.