Saving Berries For Later Use

My mulberries have been fruiting well and faster than we can eat them. I hate to see them go to waste.


None of us are big on jams so there is no real purpose in making many jars of this. However we do love our smoothies, muffins, buckles, cakes and pies. So it would be great to save the berries and be able to use them later.


Mulberry Pie

I have been busy experimenting and making various mulberry pies, muffins, tarts etc. I have an operation scheduled for this weekend and I certainly don’t want to spend a lot of time cooking any more berries. So I decided that I would freeze the remaining berries. Our tree is still quite young and the season is coming to a close.


Mulberry Muffins recipe

Frozen berries work wonderfully in making jams, pies, cakes, sauces etc. Did you know that you can freeze it whole without the need for cooking it up into the final product? Yep, you can even freeze them without blanching them too! This is especially helpful when your harvest is going faster than you can pick and use them all. Of course your neighbours would love to share in your bounty too!


Freezing the Berries:

We harvested what was nice and ripe each day. Sometimes we’d eat them or use them all up and other days I would…
  • lay the fresh berries out on cookie sheets and pop them in the freezer for a few hours.
  • Then when the berries are frozen solid, I would bag them up into freezer bags. Of course you could use containers too! 

The advantage of this is that the berries won’t clump together into a giant lump and you can remove just as many or as few as your desire, whether you are making a smoothie for one or a pie for the family. Just open the bag, grab what you need and re close the bag and place it back in the freezer as soon as possible before they have a chance to start to defrost.

Frozen berries bagged

Of course you could pack the berries into portion sizes and then grab a bag or 2 as needed.
So this way we get to enjoy the berries for a long time to come. I love this idea especially when one would normally have to pay a small fortune for berries and I can indulge myself and make my wonderful mulberry muffins.

Family Favourite: Mulberry Buckle recipe

A cochlear implant recipient has an MRI

I decided to write of my experience of having a MRI as there is very little information available for people who need to undergo an MRI head scan for whatever reason. Most of what I had been told was very negative even by 'experts' and the people at the Sydney Cochlear Implant Centre. My own personal experience is somewhat different to what I expected but certainly not as bad as what was perceived.


So let’s start at the beginning:

What is an MRI?

MRI stands for Magnetic Resonance Imaging. It is an scanning technique that uses a magnetic field and low-energy radio waves to take pictures of the soft tissues without the obstructions caused by bones. It is an important diagnostic tool for detecting abnormalities of the brain, spine and musculoskeletal systems.

Metal implants, pins etc are a problem with MRI as the magnet used is inclined to attract metal objects and as such has a big impact on people who have any type of metal inserted into the body such as pins, artificial hips and of course cochlear implants.

I have a Cochlear Implant and I needed an MRI.


The type of implant you have will determine the strength of MRI you can be subjected to or whether you need to have the magnet surgically removed temporarily. So long as Cochlear’s procedures are followed, an MRI will not damage the electronics of the implant. Cochlear produces a booklet called " MRI for Nucleus implant recipients: Radiographer's instructions" to assist you and the radiographer as to what type of cochlear needs surgical removal of the magnet & which just needs a bandage. At the back of the publication is the personal experience of a bilateral (2) implant recipient. Her experience mirrors mine in many areas. Still I have recorded my experience and have not white washed the pain at all. Do remember every person has a different pain threshold. I have been told any times through various experiences that I have a high pain threshold. That would not seem to be the case with this procedure.


My personal experience of an MRI

Warning: I have gone into quite considerable detail especially of the time in the machine. But first, let’s start right at the beginning:

When I was asked to have a MRI, to ascertain the extent & details of my vascular nasal polyp (blocked sinus), my surgeon decided to tried to get enough information from a CT scan with a dye. This gave him insufficient information in preparation for surgical removal. He consulted with my cochlear surgeon and discovered what type of cochlear I had and what MRI I could possibly undergo.
I was fortunate in that I did not need to have the magnet surgically removed which research indicates is a possibility. However the cochlear’s magnet implanted would still be attracted to the magnetic field and this will cause some considerable discomfort.

My ENT surgeon procured the information package from the cochlear people on what to expect including specific information for the radiologists. I was also given crepe bandage and some padded dressings to apply at the radiologists.

What to expect


I had never had an MRI and I had no idea what to expect. When I arrived the nurse made sure that I knew what to expect when we went into the scanning room. He explained carefully that there would be some pain or at least discomfort involved. We discussed everything beforehand and he made sure I understood by having me repeat back nearly everything he told me, to make sure I heard and understood everything that was going to happen as once he starts to wrap the bandage around my head, he knew I would be totally reliant on lip reading as I would not be able to hear much without my cochlear and my hearing aid.

All jewellery, belts and metal objects had to be removed. I was also asked if I had dentures that could come out. My head was very tightly bandaged with the padded dressings placed directly over the cochlear and encased within the crepe bandage. It was very tight but not painful. BTW - As I had been told it was a very painful procedure I decided to jump the gun and I took 2 Panadeine Forte (strong pain killers) just prior to the bandaging.

I was then asked to lie on the padded bench, with my head towards the machine. A cannula was inserted into my right arm on the inside of my elbow. First they injected a little saline and then later after maybe ¾ of the scans they injected some type of contrast dye and proceed to take some more pictures. I did not feel the saline or the dye but I hear that some people will notice a slight burning sensation or even a form of hot flush.

I had a type of helmet put over my head. It comes down to about the tip of my nose but there are ‘holes’ so that you can see through the helmet. The nurse also inserted a piece of foam just forward of my ears to help ‘hold’ my head still. Then they rolled my bench into the machine. I had already been instructed that the whole procedure will take 15-20 minutes where I am to keep as still as possible. I am also told that there will be loud sounds and vibrations mostly the type accompanied by the sounds that deaf people in particularly are aware of. As I do have some hearing of the lower frequencies, I heard quite a lot of the sounds. It must be very loud to a hearing person as it seemed quite loud to me. If anything the constant noise bombardment was annoying – the noise, if I had to live with it, would drive me crazy! By the way, the noises changes frequently, some time it is a pulsing sound & vibration and others it is constant. It is also in different pitches.

Yes it is painful. I would rate it as bad as 8 out of 10 with ten being unbearable. It is bad but not the type to make me cry - it was more like a very bad ache.

The first thing I noticed is that it felt like my head was laying on a rock that was really sticking into my head, at the location of my cochlear plate. I felt like I just wanted to lift my head off it and find a more comfortable position. The pain part is more like my head was in a helmet that was like a vice that was extremely tight and constantly squeezing ever tighter. The pain covered the area from the middle of the top of my head right across to the neck and shoulder of the same side as the cochlear. It is possible the neck and shoulder pain were the result of tension  and lack of adequate neck support rather than directly attributed to the MRI.
Part way through, I was temporarily removed for about 1 minute to have the dye injected into the cannula and then I was slid back into the machine for another 10 minutes. All up, the scans took 20 minutes.

Once I was out of the machine I had a light headed moment where the room spun but soon all was back to normal. We removed the bandages from my head and I was sent on my way. The pain killers I think were a blessing as I didn’t really have a headache – I just had the ‘memory’ or rather it was like an imprint left in the sand – the pain was gone, but you still feel where it was just recently.

I drove myself to and from the radiologist (only about 12 km – 15 minutes drive – I felt good enough that I even stopped on the way to pick up some fresh bread & a few groceries!)


After about 30 minutes I just had a tinge of a headache. I reckon the painkillers were doing a fine job. I did need to take some more painkillers after 4 hours. I also had a sleep after lunch but that might be more to do with the poor sleep I have been having due to not being able to breathe through my nose! I notice that tonight (10 hours after the scans), I probably could have a simple paracetamol as I have a touch of a head ache but I don’t like to take tablets generally, so I am putting up with it.

I know I have gone into a great deal of detail but it is just so that you know what you could expect if you need to undergo a MRI if it is really necessary.

Conclusion:

It is painful but with some strong painkillers and the knowledge that it is all over and done with fairly quickly, less than half and hour, it is do-able. I certainly don’t want to do it again, but I could and I would do it again if the doctor deems it important.

Post script: 

Three days later and it is more or less a distant memory, but one that has given me a constant headache since. I am still not keen to wear the cochlear. The area feels slightly bruised to the touch and I seem not to tolerate the sounds/sensations well at the moment.
The doctor has the information he required and now I just have to wait for the cancer operation which thankfully is less than a week away.

18 months later:


I was diagnosed with a head cancer (Adenoid Cystic Carcinoma) just 18 months ago and I did have a lot of problems with a MRI because having a cohlear is not MRI friendly as it tries to rip the magnet of the cochlear right out of my head - it was extremely painful even after advice from the cochlear centre to reduce the power and bandage up my head in a certain manner. My doc tried to avoid using an MRI but he just couldn't 'see' the affected area needed prior to my cancer operation with the other diagnosis imaging tools. The MRI dislodged the magnet of my cochlear and sadly it didn't go back into place so that effectively I have been unable to wear a cochlear in the 18months since. I get frequent headaches and the area around the implant is touch sensitive as though bruised.
I have just started the process to have an operation to put the magnet back into place so that I can recommence wearing my cochlear. The good news is that I can replace my cochlear implant with an MRI friendly Cochlear implant that has only just been released in the last year or so.This is truly a blessing as the type of cancer I have will never go into remission and a yearly MRI is one of the diagnostic tools available to keep 'watch' on my cancer.

Light & Delicious Mulberry Muffins Recipe

Oh my gosh, these Mulberry Muffins are so light, fluffy and super tasty. I couldn't stop at one. And they are so quick and easy to make too.


As you read this, I will entering day surgery for removal of a large nasal polyp, something I am NOT looking forward to, but out it must come. In the meantime I will comfort myself with some of these yummy muffins, I have stored in the freezer. I had to find some more ways to make use of all the mulberries my tree is producing.

There are not many recipes on the internet for mulberry muffins, so I just had to experiment and make my own. I used Making Home Base's Blueberry Muffins as my starting point and combined it with my own muffin baking experience to make a more simplified version.


Mulberry Muffins Recipe

2 cups self raising flour
3/4 cups sugar
1/4 teaspoon salt
2 eggs,
¾ cup milk
115g (4oz or ½ cup) melted butter
1 cup mulberries (fresh or frozen)
Demerara sugar or other coarse sugar (optional)

DIRECTIONS: 

  1. Preheat oven to 180*C
  2. Grease 12 muffin tins
  3. Melt the butter for 15-30 seconds in microwave - wait & cool down if hot.
  4. Lightly whisk egg with fork and add the eggs & milk to the melted butter.
  5. In another mixing bowl, combine flour, sugar and salt.
  6. Add the wet ingredients to dry ingredients all at once and stir until just moistened.
  7. Fold in frozen blueberries — it’s OK if the batter is a little lumpy
  8. Scoop batter into muffin cups until they are almost full
  9. Sprinkle the tops of muffins with the demerara sugar (optional)
  10. Bake in preheated oven for 20-25 minutes or until middles are set and tops are golden

I did say in an earlier post that you can't go past a great Mulberry Pie. My hubby prefers the easy Mulberry Buckle over the pie, but these muffins are my personal favourites.

Give them all a go and tell me which you like better!

Converting little knight dolls into princesses


My two little grand daughters have their birthdays within weeks of each other and since they have only just moved nearby from interstate a couple of months ago, I had very few toys for them to play with at our house. Their birthday party theme was princesses, so when I saw this wonderful 'Big Jigs' King Arthur's castle that one of my daughters pointed out, it was a no brainer to buy it for their combined birthdays.


It's biggest drawback is that it is really aimed at boys, of course being King Arthur and his knights.
I can really recommend this brand as it is a very sturdy construction.
 
There were 4 knights in the set as well as the king and the warlock

Little girls want princes and princesses not knights! So I set myself to convert 2 of the little wooden "waldorf doll" knights into princesses.

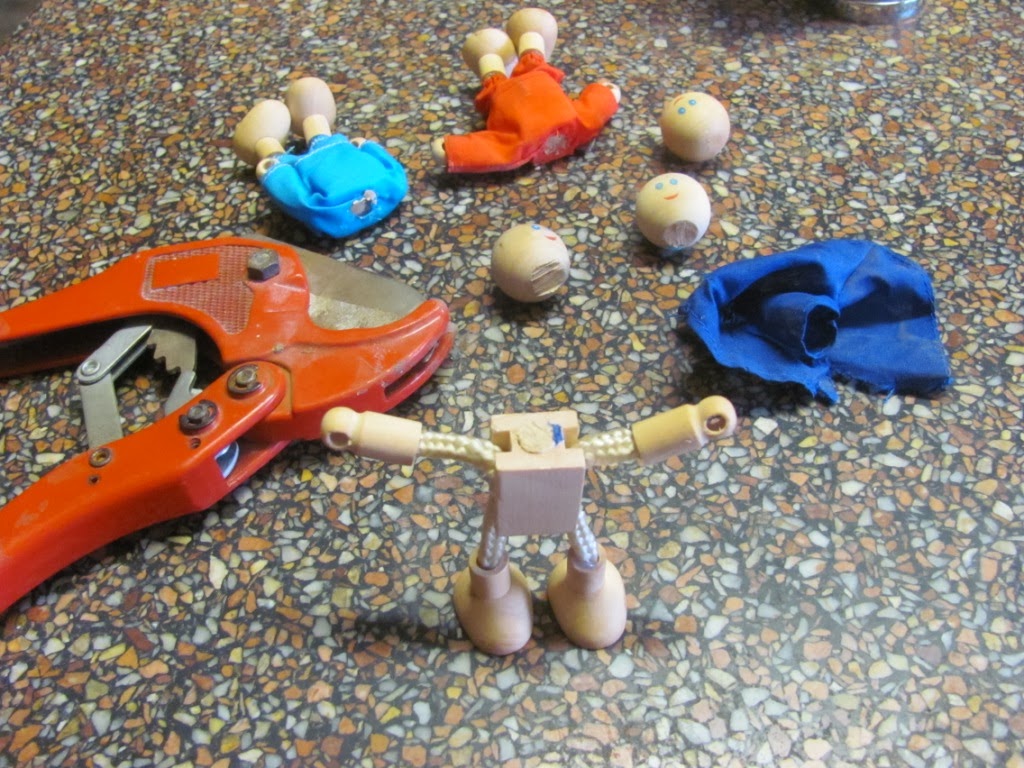
In order to undress the dolls, I had to remove their heads. My gosh, the dolls are so strong that I could not twist or prise the heads off and sought the assistance of my son, since hubby was doing some volunteer work in New Zealand at the time. The only way we could get the heads off was to literally cut off the heads.


No wonder the heads were so hard to get off, they were doweled in. That makes them well nigh indestructible for the rough handling they'll get from the kids!!!

So using the original clothing as a basis for the pattern and sizing, I proceeded to make up the dresses and a cloak from scraps of fabric left over from previous projects.


I burnt the edges using candle flame to stop the fabric fraying.


I could have machine stitched the dresses, but it was almost as fast to hand stitch such little things especially if changing cotton colours each time, plus I can catch up with a daytime tv show I might occasionally watch.


Once the dresses were made and some embellishments glued or sewn on, then I had to wait for hubby to come back to reattach the heads. He drilled out the original dowels and we glued in some new dowels.


Here are the finished princess dolls.

Miri has called this one Rapunzel.


This one she has as the wicked step mother! LOL

Still it was fun making them and the joy of watching the girls play is reward enough.

Mulberry Buckle - a super easy dessert recipe

I have discovered this delicious and super easy dessert using mulberries called a buckle. I can almost hear you asking "What is a buckle?" Here is the definition straight from Huffington Post. "A buckle layers a more traditional, cakey batter underneath the fruit. As the dessert cooks, the cake rises around the fruit, which tries its best to sink to the bottom, making the whole thing buckle inwards."


I adapted it from this recipe Lazy Day Cobbler and thought to try it out with my mulberries.

WOW! It is fantastic. It is really easy to make. I was worried as I was making it that it would be too sweet but it wasn’t. It great for an easy to make dessert. I had boobed and what I thought was cream in my pantry was actually full cream milk, so we had to eat it ‘naked’ and it still got the thumbs up. I am sure it would be fabulous accompanied with cream or ice cream. It is enough for 6 people. I am going to try to halve it as our youngest is leaving the nest in just 3 weeks (to live in Japan!)

Mulberry Buckle

Fruit Mix

400g mulberries
1/2 cup sugar
1 tablespoon cornflour
2 tablespoon lemon juice

Cobbler mix

1/4 c. butter (melted)
1 c. flour
1/4 tsp. salt
1 c. sugar
1 1/2 tsp. baking powder
3/4 c light milk (1% fat)

1. Preheat oven to 180oC (350oF).
2. In a bowl, sprinkle the fruit with the 1/2 cup of sugar slightly mashing the fruit leaving some bigger pieces for bite. Stir in the cornflour and lemon juice.
3. Set aside whilst making the cobbler part.


4. In a bowl, mix together the flour, salt, 1 cup of sugar, baking powder and milk, with a fork.


5. Place melted butter in an 18cm x 28cm (7" x 11") slice tray.
6. Spread the batter in the dish directly over the butter.


7. Pour mulberry mix over the batter.


8. Bake for 50 minutes.
9.Let cool for 5 minutes before serving if you can wait that long.


Please a note in the comments if you have a favourite dessert recipe.


Family Home and LifeScattered Thoughts of a Crafty Mom


Click on the links above if you want to see more inspirations for crafts, recipes and more.
Join us and let's link up!

Operation Christmas Child: The gift of love

Operation Christmas Child a project from Samaritan’s Purse that our family has been involved in for many years. This is an awesome way to give a child a gift who may not get anything at all for Christmas and to see that we can use some of our abundance to help make the holiday a little brighter for them. It is a great way to teach our children the importance of giving, to share our abundance with others who may otherwise never receive even a single gift in their lives to date.


How to participate

  1. Grab an empty shoebox or other small plastic container.
  2. Choose a gender and age group for your recipient and print off a handy label.{age groups are 2-4, 5-9, and 10-14}
  3. Go shopping or even better if you are crafty, make somethings!

Make or buy gifts to fill your box that will bring joy to a child. We/you can fill a shoe box with items that a child would like to receive. There are a few 'rules' such as no food or second hand items can be included, also please no toys of violence such as guns & swords.

I generally start with an idea of what age and sex child I want to aim for. I choose this year, we decided to gift a 8-10 year old boy. (I think this is a harder age group and therefore thought others might shy from it).

Just as I finished my boxes for this year, I found This free Small Doll Sewing Pattern made exclusively for Operation Christmas Child Shoe Boxes.

I love to sew and next year this is something I would love to do.
If you follow her blog she also has free tutorials for painting a doll's face and for other modifications.

Free pattern available from Sarah's blog.

Jamie and Amy each have 100 wonderful suggestions for possible inclusions so that you have an idea of what could go in such a box. It is not too late to make up a box this year, but you will have to hurry as they need to be pack and shipped to their destination very, very soon. I am sure that there is a drop off point near you, whether you are in Australia, New Zealand or USA. (I am not sure about other countries.)

Can I help in other ways?

You could consider donating towards the cost of shipping and other related project costs. $7 has been suggested for each box, though more or less is just as appreciated.

Every year, thousands upon thousands of generous people across the world lovingly pack shoe boxes with gifts a few months before our Christmas as a simple, yet powerful messages of God’s unconditional love.

Thankfully there are many people who participate in OCC each year.

Zebra heat pack

Well this week has been rather hectic but still I managed to get another heat pack made. This time it is my zany  Zara Zebra.


Things don't always go according to plan. This cute zebra wasn't meant to be a heat pack. I was aiming at making a hobby horse type zebra with this printed flannelette material I had pick up in the remnant pile from my local Spotlight store.

I designed it, cut it out and sewed it up. But when I went to stuff it, it just didn't look big enough. By the time I had rounded it out the head appeared too small for the broom stick. Bummer!

But I can't waste it completely, so I thought I'd fill it with 2 cups of rice and turn it into a heat pack! So now it can join the other heat pack owls I made here.

Instructions or rather how I did it:


  1. I cut the material to my own pattern.
  2. Out of some felt, I cut a strip of black approx 10cm (4 inches) wide and 22cm (8.5inches) long and cut a fringe along one edge. I cut two black circles and 2 white circles for the  eyes. I also cut 2 sort of triangles in black  for the ears and 2 smaller white triangles for the inner ears.
  3. The ears and mane were placed along the seam line between the main fabric and sewn into place at the same time as doing the main seam, leaving about a 3cm (1 inch) gap at the bottom.
  4. I used a funnel to direct 2 cups of rice inside the zebra.
  5. The sewing the opening closed with a whip stitch.
Ta da! It is finished.

Do you prefer the owls or the zebra?

I rather like making these. I might try some other animals...
but first I really want to conquer the hobby horse for my granddaughters!!!

Classic Cheesy Macaroni

This is one food that brings back memories of my childhood. It is so easy to make. I was horrified to find that there are many people who have never tasted the fresh stuff, they have only had the packet stuff. Shudder... how can you compare?

Cheesy Macaroni

This is certainly not one for weight watching. But sure is high on the comfort food charts. This recipe will make a big lasagne tray. It can feed 6 big hungry footballers, no problems. If you want to keep it simple and healthy then serve with side vegetables and/or green salad and it will probably serve 10 people for a family gathering.

You can also divide it up into smaller casserole dishes and freeze some. It keeps very well in the fridge for several days, if anything I think it develops more deeply the inherent flavours within it.

Cheesy Macaroni

500g macaroni
1 onion, chopped
60g margarine or butter
300g bacon, diced
2/3rd cup flour
¼ teaspoon mustard
Salt & pepper
500g grated cheese
1 1/2  cups milk powder
5 cups of water
1 cup breadcrumbs

Method

Cook macaroni in pan of large pan of boiling water. Drain when just cooked.

Meanwhile you can get started on the sauce by melting the margarine/butter in the microwave for 10-15 seconds and then cook onion in the margarine on high until translucent for 2 minutes in the microwave.
Add plain flour, mustard, milk powder, salt & pepper.


Slowly add the water at about 1/4 cup at a time and mix to ensure a lump free sauce.


Cook in the microwave on high for 10 minutes, stirring every 2-3 minutes until the time is up.


If desired you can add more milk if you think it is getting too thick. You want it to be like a thick pouring cream albeit lumpy from the onions only. If you interrupt the cooking every 2 minutes and stir it well, it will be perfect - not gluggy & lumpy from undissolved flour clumps.

Only lumps is from the onions!
You will need to transfer the sauce into a large mixing bowl.
Stir in the grated cheese, diced bacon pieces & the cooled drained macaroni. whilst the sauce is still hot. Mix well.


Transfer into greased baking dishes.


Melt a litte extra butter with the breadcrumbs and sprinkle the tops with the breadcrumbs.
Cook in 180o C (350o F) for approx 25 minutes.


This will be one dish you'll want to come back to time and time again.
So go ahead, start your own tradition and create something that will cause your family to have fond memorie.

Featured on
creativelylivingblog.com

DIY cute and easy owl heat pack

We have the gorgeous Tawny Frogmouth Owl on our property. He is so well disguised you are hard pressed to find him unless he moves. Now in the fabric & craft world one can see owls everywhere. So I decided that I wanted to make a cute owl heat pack for my grand daughters.


It is a hoot to sew this simple and absolutely adorable, microwavable owl heat pack.  I played with various design concepts and each one was different from the preceding one. This owl has been strongly influences by Dustin Pike's cute digital clip art owls. To keep things nice and simple, this tutorial is the easiest version.

Owl heat pack tutorial


Materials I used:

  • 2 larger scraps of material approx 20 x 20cm each (8 x 8 inch). I used a minky type fabric for this tutorial, though my other ones have been made from fine pin-whale corduroy. Duck, ticking and most tightly woven cotton materials would be best. Fleecy works well too.
  • Felt scraps for the eyes and beak. A few of my owls had the eyes made from scrap materials too!
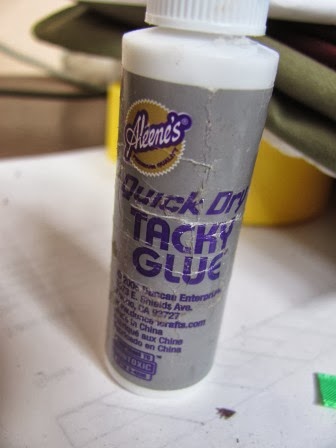
  • Aleene's Tacky Glue
  • 1 1/2 cup rice 
  • 1 sprig of lavender (optional and interchangeable with other scents though not many flowers work well unless pre-dried.
  • A funnel was handy. 
  • Pattern: See the end of the post for the free pattern. 

I mostly used my machine for all stitching though I would hand sew the lot if I were traveling on the road, since it is a small project and I like hand sewing too - though my blanket stitch leaves a lot to be desired! LOL

Instructions:

CUTTING
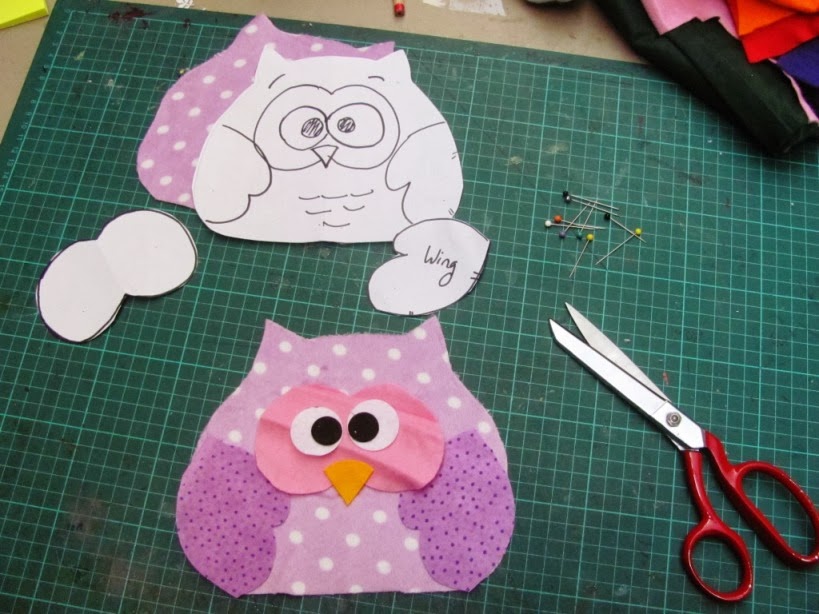
Cut a basic outline of the owl body shape with a 5mm (1/4 inch) seam allowance.*and then from a contrasting or coordinating fabric, cut 2 wing shapes.

Then from some felt remnants, draw a triangle for the nose and some circles for the eyes. *

Then the larger 'double circle' shape for the joined eye patch
Right so that is all the material cut and ready for sewing now. Play around with placement and pin if desired.
I need to go and wet and iron my pink eye patch - it just wont lay flat!

SEWING

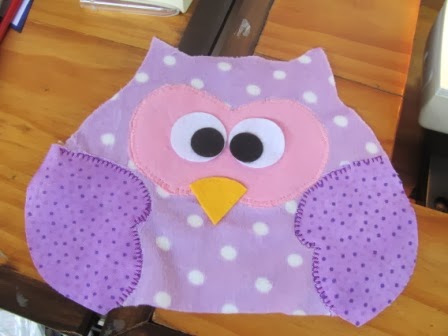
    Sew the wing shapes  onto the body front using a zigzag or blind hemming stitch.**.

    Sew the larger 'double' eye in the same manner as the wings


    Since I have used felt I decided to glue the beak and the rest of the eyes. First I glued the beak and then the black pupil to the white of the eye. Before the final attachment of the eyes, I played around with a couple of different eye positions just for the fun of it. Which look do you like best. I think each changes the owl's expression!


    He is getting dizzy with all the changes  - LOL
    OK I decided he is going to be looking up! So I glue it on.


    Now to the actual bag/body part First pin it right sides together. Don't worry about the wings hanging out as they do on mine.

    Place right sides of the body together and stitch small straight stitches leaving a 5cm (2 inch) gap at the base. My machine is playing up and skipped a few stitches every now and then so I decided to sew around a second time as I certainly don't want any rice leaking out!!!


    Now I like to clip the pointy ears to remove some of the bulk.


    I also like to clip around the curves, even to removing little triangles in the seam to reduce the bulk. It is not strictly necessary, but it is what I like to do.


    That's the machine sewing done. Now turn the bag right side out. I like to use a fat pen with the pen part wither retracted or removed to poke the ears out. I found a knitting needle more often poked a hole through the fabric for me.


    Using a funnel for ease, add  about 1 and a half cups of rice, or wheat and a tiny little of whichever flowers or herbs you would like to use.


    Hand sew shut the gap. And you are done.
     
    It actually is slower taking all the photos and writing up the steps than it is to just get stuck into the job. It really is so simple and doesn't take much time at all.
    Tada!

    To use: 

    Microwave for 1 minute and then in 10 second increments until your owl is nice and warm. Be careful not to microwave for any longer than 3 minutes as it will overheat.


    Hints: 

     *     I have a PDF pattern you are free to use to your hearts content with no restrictions other than no direct use of pattern on your blog or other media but feel free to link back or sew and sell finished owls anywhere.
    **   A Blind hemming stitch can resemble a hand sewn blanket stitch by altering the settings.
    *** With felt and fleecy, you can avoid sewing by using a soft tacky glue such as Aleene's
    Machine sewing the eyes - just take it slow and turn constantly

    Variations:

    You could stitch the body around the edges on the outside instead (and avoid the turning bit) for a more rustic look. You will still need to leave a gap at the bottom for the filling before continuing with the sewing. Be aware some fabrics will fray more than others, for some that is part of the charm. You could also cut the shapes with a pinking shears which will reduce a lot of the fraying.

    Button Eyes?
    I choose not to use buttons, firstly because my original owls went to very young children and I didn't want the risk of them choking on a button if it came off. Secondly, buttons are hard and uncomfortable in some positions when using a heat pack. Be especially aware of the googly eye type buttons as many of them are made from a soft plastic which could melt or worst in a microwave oven.

    Stuffing:
    I prefer rice to wheat as the heat material for the much lower allergen problems. Both are prone to absorbing moisture if in a high humidity environment. If this this the case then I suggest you make a cotton calico inner bag and then the outer owl. This way you can replace the inner bag and keep the decorative outer bag. I also like to add a sprig of lavender. You could add a variety of scents. Try a cinnamon stick for a spicy scent especially for a male recipient.
    Of course you can turn this into a softie just by changing the filling from rice to fibrefill.

    Feet?
    On one owl, I added little ribbon feet before sewing the front and back together
     

    See his little feet poking out?
    This next one was my very first owl. Sewing the wings on like this was much more fiddly, but I really wanted to incorporate the hearts which were left overs from a skirt I had made recently for one of my grand daughters. The feet was pretty simple.

    I hope you can just click on the picture above and save it to your computer. Enlarge it to fit on your page when printing. I had a go at embedding a PDF file, but I didn't like the look on my blog post. Since it was my first attempt, maybe I did something wrong. If this doesn't work for you then just send me a message via email, Google+ or Facebook and I will send it to you by return email.)


    I have entered this in my first craft linky party. When you click on that button it takes to the 'party' where lots of people are posting their crafty posts (and some yummy recipes) for the party.

    I actually found another linky party, so here are the two parties. Please come and join me on the new adventure!

    All Things with Purpose